


")
Sharp Distance Measuring Sensor GP2Y0A41SK0F Tutorial
In this tutorial, you will learn how to use the GP2Y0A41SK0F Sharp sensor with a simple example. After this tutorial, you will be able to display on your monitor the distance between the sensor and an object.
The GP2Y0A41SK0F is very useful for detecting very close objects (4 cm to 30 cm).
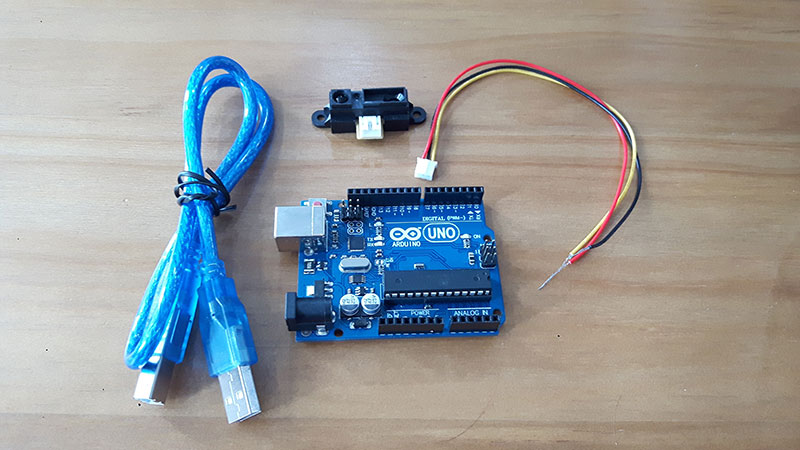
To test out this Sharp sensor, you'll need:
Hardware:
- Arduino Uno
- GP2Y0A41SK0F Sharp distance sensor
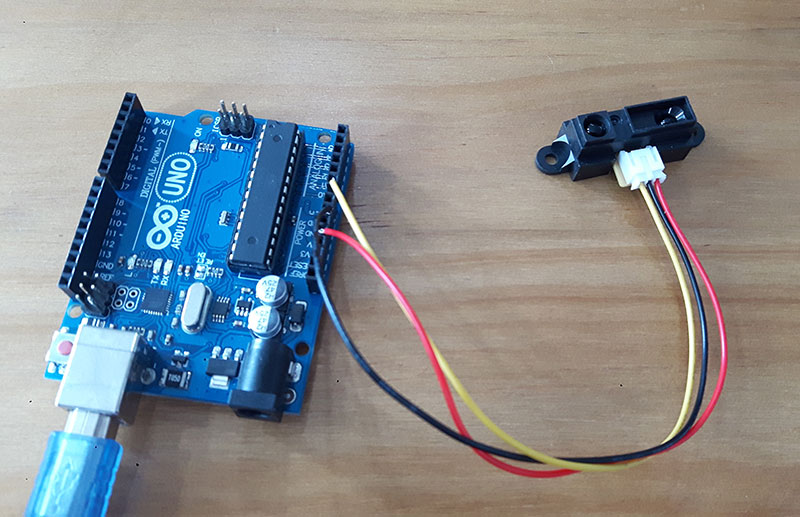
The sensor uses a 3-pin JST PH connector. These cables have a 3-pin female JST connector at one end. On the other end, the wires are unterminated, so you must strip them at the appropriate length with scissors or a wire stripper.
Firmware:
- Arduino IDE
- Example Code
Tools:
- A manual wire stripper (You can find many tutorials on the internet on how to use this tool)
If you bring up the picture of the Sharp sensor, you'll find on the right of the sensor, the position sensitive detector. On the left, is the IR emitting diode.
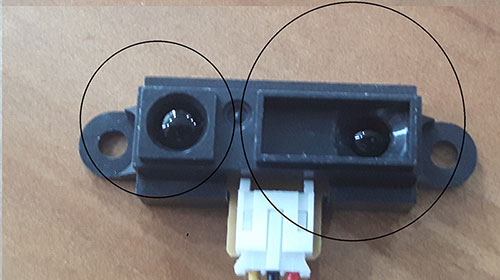
How the position sensitive detector work:
Generally, when the detector area is exposed to a light spot, the device will convert light into several outputs of electrical currents in each of the sensor's electrodes. Using the distribution of the outputs currents you can then find the light position
When you add an IR emitting diode you can make a distance sensor.
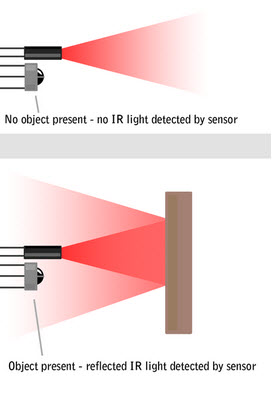
The diode will produce light with a specific wavelength (IR) and the light sensor will only detect this wavelength.
When an object is close to the device, the light will bounce back on it and the intensity of this light will be measured by the sensor (the voltage in our case). The sensor will then use this data to determine the distance of the object.
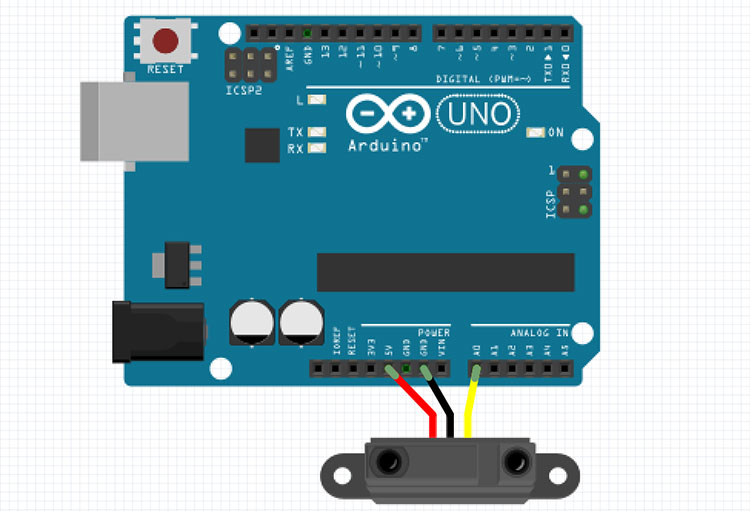
Hook Up the Sensor and Arduino
| GP2Y0A41SK0F Sensor | Arduino UNO |
| VCC ( red wire) | 5V |
| GND (black wire) | GND |
| Signal (yellow wire) | A0 |
Upload and Run the code:
- Connect your Arduino device to the computer using the USB cable
- Open your Arduino IDE (Install the IDE if you haven’t already at www.arduino.cc/en/Main/Software)
- Verify you have the correct board selected under Tools > Board
- Verify you have the correct COM Port selected under Tools > Port
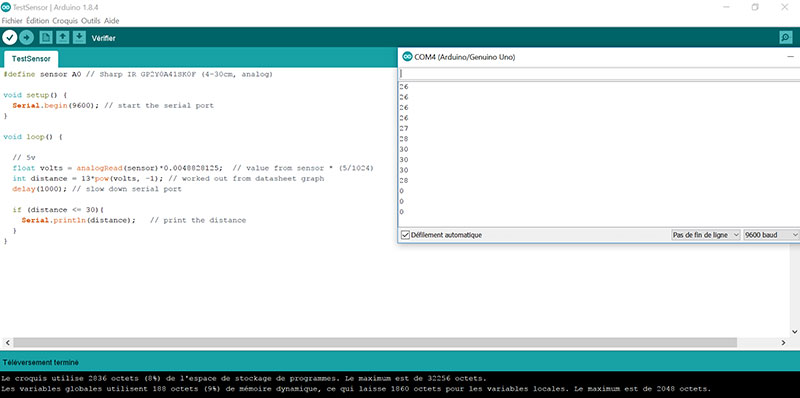
Here’s an example code you can upload. It will print the distance between an object and the sensor.
Upload and enjoy

Understand the Data
Why do we multiply value from the sensor by (5/1024)?
We convert the analogRead() value to a voltage.
The analog pins convert the value of the sensor to a byte value which is between 0 and 1023.
But we need the real analog value. To do that, we divide the voltage rating, 5V, (maximum voltage that can safely be applied to an electric device) by 1024. Then we multiply the result of this operation by the value from the sensor to get our voltage.
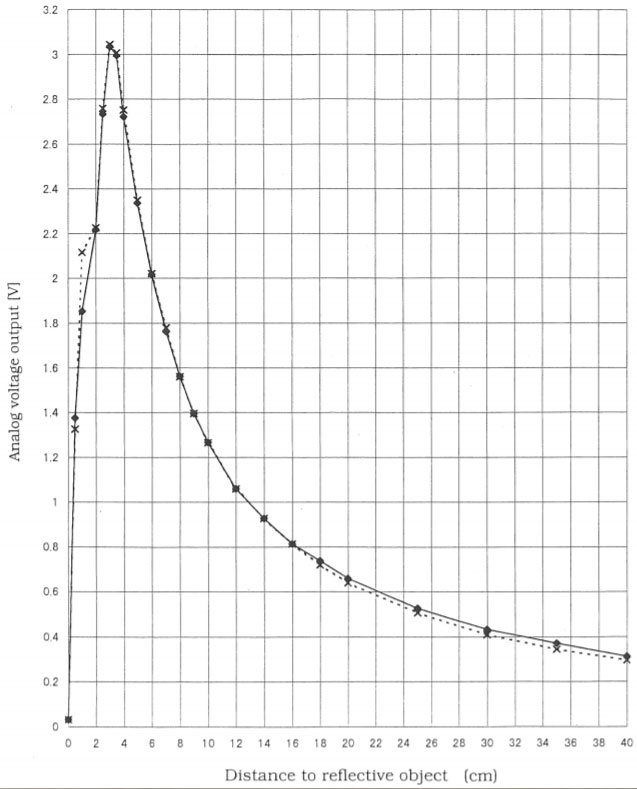
What is pow(volts, -1)?
In this line ‘volts’ is the base and -1 is the exponent (power to which the base is raised).
Based on the SHARP datasheet graph we can calculate the function (For distance > 3cm, it’s exponential).
The serial monitor (Tools > Serial Monitor) is a feature of the Arduino IDE that is very useful to debug your code or to control your Arduino from your computer. In our case, the distance between the sensor and the object will be printed on this monitor (9600 baud for this code).
Now that’s you’ve successfully made this sensor work, it’s time to use it for your own projects! If you need inspiration of what to create, browse the other products on our website, maybe you'll find your next great project there.
4 Comment(s)

If u don't mind, can u explain how to get 13 in the code " int distance = 13 * pow(volts,-1); "? Thank u so much.

Hi Noral,That is the formula from GP2Y0A41SK0F's datasheet, to convert the voltage data to distance.Best, Alex

hey i want my sharp ir to measure a small measurements and display it in mm range with an accuracy 1mm . so can u suggest me any code to do so.

I couldnt find the formula from the datasheet, can you pls screenshot and share it here. I tried to prove the formula manually but it didnt match.
hai noral i want to measure small distance using sharp ir and display it in mm scale with an accracy of 1mm. so can u suggest me arduino code to do so
hello Mahesh,In the demo code we use int distance = 13*pow(volts,-1); to get a centimeter value, so if you need the millimeter value, you can just use int distance = 13*pow(volts,-1)*10; then this will be mm value. In the meanwhile, you need to change the condition code to: if (distance <=300)then everything should be fine.best,

Hi Mo,The formula is from the curve in the datasheet, it is not 100% precis. The formula is distance = 13*power(volts,-1). You can check the screenshot for the code in this blog. best, Alex Chu from Smart Prototyping Team

salve, se la formula = 13 * pow (volt, -1) è un dogma allora sono d'accordo. vorrei cortesemente e umilmente sapre , da dove deriva il numero 13 moltiplicato per la tensione elevata alla meno 1. ho analizzzato i grafici, controllato le poche formule del datasheet, ma non sono riuscito a capire la provenienza dela = 13 * pow (volt, -1). forse sono io a non capire... help. help.help.