


")
")
")

Zio Light Sensor Qwiic Start Guide
This post is part of our Zio Qwiic Start Guide Blog Series.
Table of Contents
- Introduction
- Zio Light Sensor Overview
- Configuring your Zio Light Sensor
- Installing Libraries
- Connection Setup
- Testing Example Codes
- Code Explanation
Introduction
You will find light sensors ubiquitously used in mobile phones and tablets. Like a thermometer senses temperature, light sensors “sense” light. It is measured as a unit in Lux.
What uses are for light sensors? There are many uses of a light sensor. You can use it to control brightness, measure illuminance to detect placement, use as security to detect intrusion in a room or containers, planning placement for objects that needed more or less sunlight or light, and in Agriculture for example, it could be used to manage a sprinkler system automatically, only watering when the sun is not at its brightest.
This guide will show you a simple overview of what Zio Light Sensor can do with example code to test and demo.
Zio Light Sensor Overview
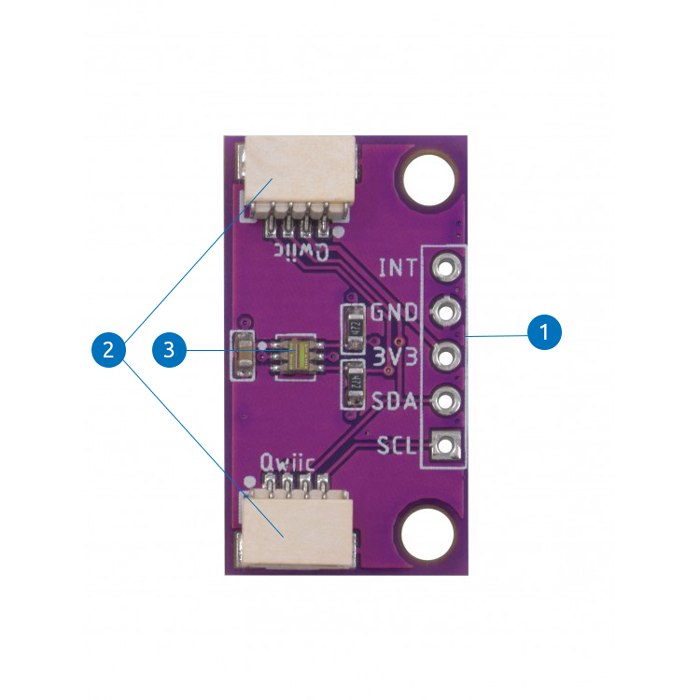
- Power and Logic Pins
- INT - Interrupt Pin (In)
- GND - Ground Pin (Supply)
- 3V3 - 3.3V Supply Pin
- SDA - Signal Data Pin (In/Out)
- SCL - Signal Clock Pin (Out)
- Qwiic Connectors
- TSL2561 Light to Digital Converter
- Selectable Addresses:
- 0x39 (Default)
- 0x29
- 0x49
- Selectable Addresses:
Configuring your Light Sensor (TSL2561)
Difficulty Level:
Helpful Resources:
This qwiic guide has a separate post on our development board guides. Check them out below:
Installing Libraries
You need to install the following libraries to your Arduino IDE before you can start programming your Zuino board with Zio Qwiic RGB Color Sensor.
Download the following libraries and save it on your local Arduino IDE libraries folder:
To install the libraries open your Arduino IDE, go to Sketch tab, select Include Library -> Add .Zip Library. Select the above libraries to be included on your IDE.
Connection Set up
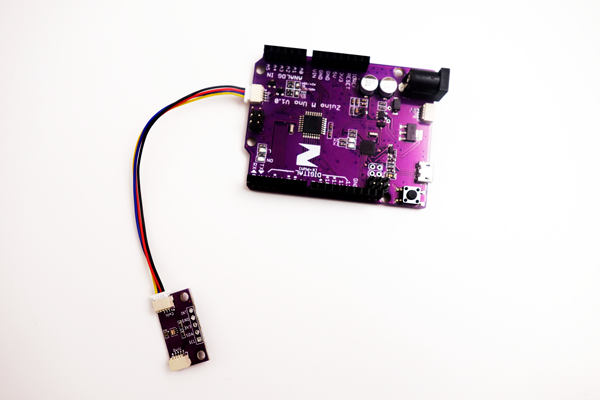
Connection with Zuino M Uno
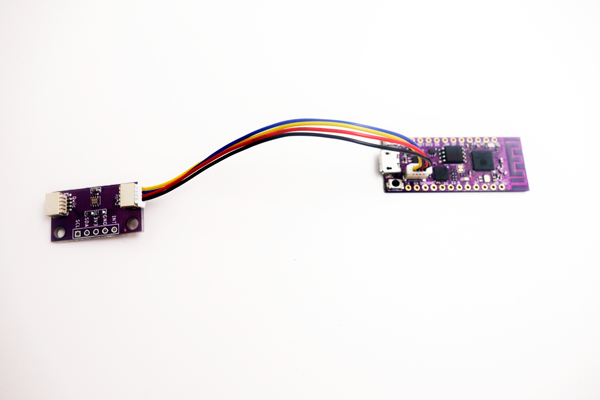
Connection with Zuino XS PsyFi32
Testing Example Codes
We are going to demo our Light sensor using the following example codes. The following examples work with our Zio development boards. Just select the right board and port from the Arduino IDE platform.
Open your Arduino
Go to File > Examples > TSL2561 Arduino Library > tsl2561
Open Serial editor to view the results
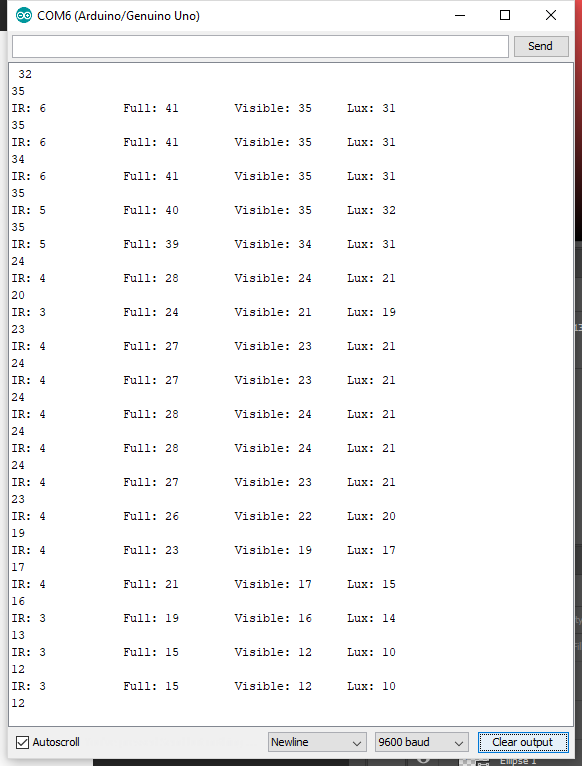
The light sensor will measure the values of Infrared light, Full Light, Visible light and Illumination (Lux).
Code Explanation
The library is fairly simple to use. The first line of code in the example is the 'constructor' where you can supply the I2C ADDR (in case you want to change it), and a unique ID to attach to this sensor (you can just leave this to the default value for now). By modifying the I2C address we can have up to three TSL2561 sensors connected on the same board:
// The address will be different depending on whether you let

// the ADDR pin float (
addr 0x39), or tie it to ground or vcc. In those cases
// use TSL2561_ADDR_LOW (0x29) or TSL2561_ADDR_HIGH (0x49) respectively
TSL2561 tsl(TSL2561_ADDR_FLOAT);
Next, in the code, you will want to configure the sensor with the gain and integration time.
You can have either a gain of 0 (no extra gain, good in low light situations) or a gain of 16 which will boost the light considerably in dim situations.
You can also change the integration time, which is how long it will collect light data for. The longer the integration time, the more precision the sensor has when collecting light samples.
// You can change the gain on the fly, to adapt to brighter/dimmer light situations//tsl.setGain(TSL2561_GAIN_0X); // set no gain (for bright situtations)
tsl.setGain(TSL2561_GAIN_16X); // set 16x gain (for dim situations)
// Changing the integration time gives you a longer time over which to sense light
// longer timelines are slower, but are good in very low light situations!
tsl.setTiming(TSL2561_INTEGRATIONTIME_13MS); // shortest integration time (bright light)
//tsl.setTiming(TSL2561_INTEGRATIONTIME_101MS); // medium integration time (medium light)//tsl.setTiming(TSL2561_INTEGRATIONTIME_402MS); // longest integration time (dim light)
// Now we're ready to get readings!
}
For simplicity purposes, we have opt to set the Integration time for the sensor at the shortest time following a bright light sample. We also set the gain to be for dim situations by uncommenting the tsl.setGain( TSL2561_GAIN_16X).
You will get to manually read the individual photo diodes, by calling the getLuminosity function. This function will return a reading in SI lux units, which is probably the easiest unit to understand when working with light, to read the infrared, full spectrum diode or 'visible' light channels:
// Simple data read example. Just read the infrared, fullspecrtrum diode
// or 'visible' (difference between the two) channels.
// This can take 13-402 milliseconds! Uncomment whichever of the following you want to read
uint16_t x = tsl.getLuminosity(TSL2561_VISIBLE);
//uint16_t x = tsl.getLuminosity(TSL2561_FULLSPECTRUM);
//uint16_t x = tsl.getLuminosity(TSL2561_INFRARED);
Serial.println(x, DEC); // More advanced data read example. Read 32 bits with top 16 bits IR, bottom 16 bits full spectrum
// That way you can do whatever math and comparisons you want!
uint32_t lum = tsl.getFullLuminosity();
uint16_t ir, full;
ir = lum >> 16;
full = lum & 0xFFFF;
Serial.print("IR: "); Serial.print(ir); Serial.print("\t\t");
Serial.print("Full: "); Serial.print(full); Serial.print("\t");
Serial.print("Visible: "); Serial.print(full - ir); Serial.print("\t");
Serial.print("Lux: "); Serial.println(tsl.calculateLux(full, ir));
delay(100);
That's it! The example should be easy to understand and work into your own projects from here!
Got questions or suggestions? Or just want to greet us? Drop us a comment below!