


")

")
Zio Qwiic OLED Display project, code explained
Introduction
In our previous blog, we created a beginner “Hello World” tutorial explaining how to use Arduino UNO with an OLED display. Back then we focused more on producing PCBs for others rather than creating one for ourselves. Now, we have our own boards, our own brand called Zio, and we are proud to announce to the world how awesome our board is! It’s time we have an updated version of that “Hello World” or should we say “Hello Zio Youngling”, befitting the Zio Qwiic way.
Objective:
In this tutorial, you will learn how to display text on a Zio Qwiic OLED 0.9in display and also have that text scrolling. You will also have an understanding of what each example codes mean by doing this simple project. By the end of this tutorial, you will be able to build projects using Zuino M UNO and a Zio Qwiic OLED display.
Difficulty Level:
Helpful Resources:
We have created Qwiic guides of our Zio products which help Younglings and those who wanted to use our products to get a qwiic start ahead with their projects. It is necessary to complete this guide, before you start attempting to do this project. :)
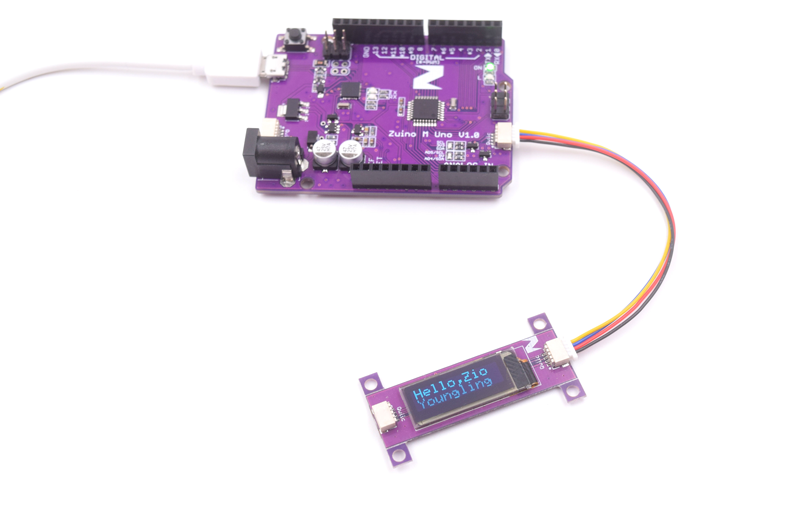
“Hello, Zio Youngling”
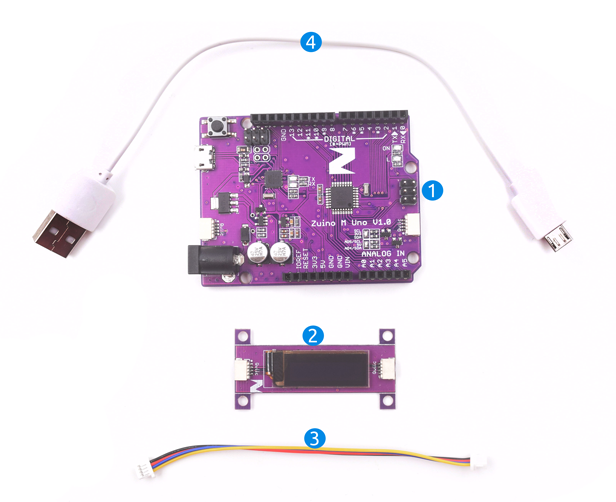
To qwiicly prototype this project you should already equip yourself with the following:
Hardware:
Software:
We have a separate tutorial on installing the libraries above for the Zio Qwiic OLED Display. Check out our Zio OLED Display Qwiic guide blog post here.
Steps
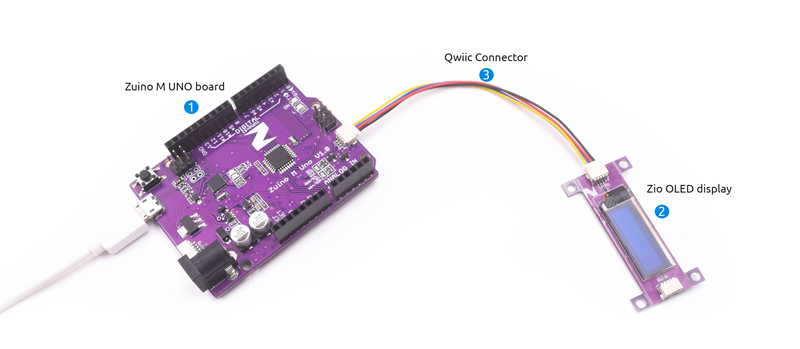
Step 1 Connect your OLED display to Zuino M Uno
Step 2 Program your Zuino to display text on OLED Display
To do that you need to include the following libraries for the display to work with your Zuino board.
#include <SPI.h>
#include <Wire.h>
#include <Adafruit_GFX.h>
#include <Adafruit_SSD1306.h>
Then you need to define your OLED display
#define OLED_RESET 4
Adafruit_SSD1306 display(OLED_RESET);
In the setup code type the following:
// initialize with the I2C addr 0x3C (for the 128x32)
display.begin(SSD1306_SWITCHCAPVCC, 0x3C);
// init done
display.clearDisplay();
delay(1000);
The first code asks you to initialize your OLED display to run on the first setup. In setup code, your code will only run once. This means that any code written inside the setup section will only be programmed to read once by your board.
In the loop section before you run your code type the following:
display.clearDisplay();
delay(100);
Since this is a loop code, any code programmed here will run repeatedly. The above code just states that it will clear any previous code before starting the new one. This will give a nice ‘pause’ effect before (use delay and set the number of ms you want it to be delayed) your next code runs.
Step 4 Display your text
To display your text create a new function call ‘displayText’ down below after the loop section and type the following code:
void textDisplay(){
display.setTextSize(1);//set the size of the text
display.setTextColor(WHITE);
display.setCursor(0,0);//set the position of your text in this case it is centered
display.println("Hello,Zio Youngling!");//Type the text you want to display here
display.display();//simply display and run the above code
display.clearDisplay();
delay(1500);
}
Inside the loop section input the following:
// text display tests
textDisplay();
Step 5 Scroll text display
Different from the previous blog, we give you the rundown on how to display your text. Under the OLED Zio Qwiic guide post, for the examples code, you will come across the text-scrolling part where your text scrolled from right to the left and back again. Well today, for simplicity purposes (cause it's a beginner project tutorial), we will only display our text to scroll to the left.
To do that create a new function called “textScroll” below after the loop section and type the following:
void textScroll(void) {
display.setTextSize(2);
display.setTextColor(WHITE);
display.setCursor(12,0);
display.clearDisplay();
display.println("Hello,Zio Youngling!");
display.display();
delay(1000);
Then type the following code that lets you display your text in a scroll. In this case, we want to scroll our text to the left.
//Scroll text to the left
display.startscrollleft(0x00, 0x0F);
delay(1000);
display.stopscroll();
}
Step 6 Upload your code and you’re all set to marvel at your awesome project~
Give yourself a pat at the back Youngling cause you managed to run your OLED project successfully. Training is now complete for this part, until next time :)
Here’s the full code of the “Hello, Zio Youngling!” project. Alternatively, you can download the code from our github page here.
Here's a demo code for PsyFi32 :
Check out the set up video of the above project below:
(Last Updated: 30th January 2019)
1 Comment(s)

Dear Sirs,The code of the “Hello, Zio Youngling!” works fine with the Arduino UNO, MEGA 2560 and with OLED 0.91" Display, but not work with the Zuino XS PsiFi32 development board (the Arduino core for ESP32 is installed). This code is compiled and loaded to the Zuino XS PsiFi 32, but the display do not react. Please advice what is wrong.Best regardsJerzy Kollataj AMEX Research Corporation Technologies (Poland)website: www.amexlab.com.pl email: amexinfo@amex.pl P.S. We are distributor for yours products. Please see our website. We want to put on our BLOG more detailed information about your ZIO Qwiic Modules. Tested and verified codes are very important for our customers.

Hi Jerzy,Aswana here from Smart Prototyping. Thank you for pointing it out and reading our blog post. Although the tutorial is set for Zuino M Uno, PsyFi32 (ESP32) should work as well. But it seems that you have problems running the code for PsyFi32. We will check on it and try running it for PsyFi32 and get back to you soonest.