


")

")
Zio RTC Module Qwiic Guide
This post is part of our Zio Qwiic Start Guide Blog Series.
In this tutorial, we will learn about Real Time Clock (RTC) and how Arduino and Real Time Clock IC are interfaced as a timekeeping device. Here we will cover the basics of Real Time Clock or RTC, the specifications of DS3231SN RTC IC and how to interface a Real Time Clock like with Zio.
Table of Contents
- Overview
- Why use RTC Module in Your Projects?
- Zio RTC Module DS3231
- Basic Connection Setup
- Installing Library for Arduino IDE
- Example Code
Overview
An RTC or Real Time Clock is a Timekeeping device, usually in the form of an Integrated Circuit (IC). An RTC is battery powered and keeps track of the current time even when there is no power.
RTC ICs are commonly present in computers, servers, on some embedded systems and in fact they are used wherever keeping accurate time is required.
Why use RTC Module in your projects?
Although almost all microcontrollers have its own built-in timers and timekeepers, these components are in fact power dependent. Once the power is turned off either manually or due to a power outage, the timers will be reset back to 0. You need a reliable Real Time Clock to record your timestamps when power failures happen.
The use of RTC Module is best for projects like data logging, clocks, alarms, etc where the timer runs independently irrespective of the external power or if the Microcontroller (or Arduino) is reprogrammed.
Another advantage is, all RTC ICs are low-current which can run for years on a single lithium cell battery (usually CR2032). Not only is this power efficient, but it is also cost-effective in the long term.
Zio RTC Module DS3231
This ZIO module features a low power real-time clock battery backed based on the DS3231SN IC. This board has a high precision and fast I2C (400kHZ) bus with an integrated temperature compensated 32KHz crystal oscillator (TCXO) and crystal. The TCXO provides a stable and accurate reference clock and maintains the RTC to within ±2 minutes per year accuracy from -40°C to +85°C.
The real-time clock counts seconds, minutes, hours a day, date, month and year with leap year compensation. The clock operates either the 4-hour to 12-hour format (which includes AM/PM indicator). It also compensates the month days, and the date is automatically adjusted at the end of the month. Some other cool features in this little board, it provides two programmable time-of-day alarms and a programmable square-wave output.
Make readings is pretty simple since all the communication is via I2C integrating the Qwiic connect system, but as most of our boards, we included the pinout in case you want to use a breadboard. The TCXO frequency output is available at the 32kHz pinout.
Specification
- Supply Voltage: 3.3V
- Current Consumption: 200μA
- Interface: I2C
- Battery Backup
- 32KHz crystal oscillator
- Operating Temperature Range -40°C to +85°C
- Low-Power Consumption
- Real-Time Clock Counts Seconds, Minutes, Hours, Day, Date, Month, and Year with Leap Year Compensation Valid Up to 2100
- Two Time-of-Day Alarms
- Programmable Square-Wave Output
- IC:DS3231SN
- I2C address: 0x68
Board Overview
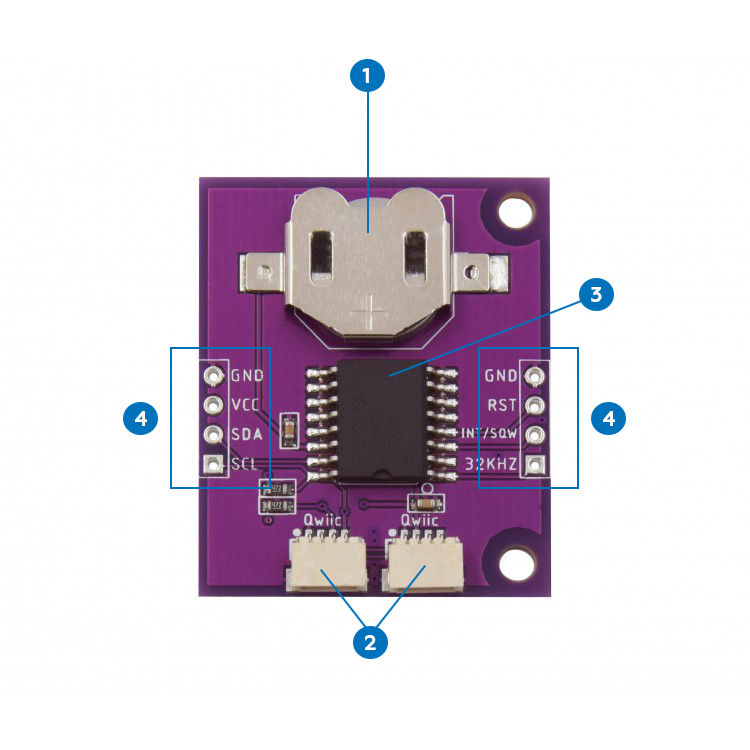
- Battery placeholder
- Qwiic Connectors
- DS3231SN IC
- Default IC Address: 0x68
- Power, Signal and Logic Pin
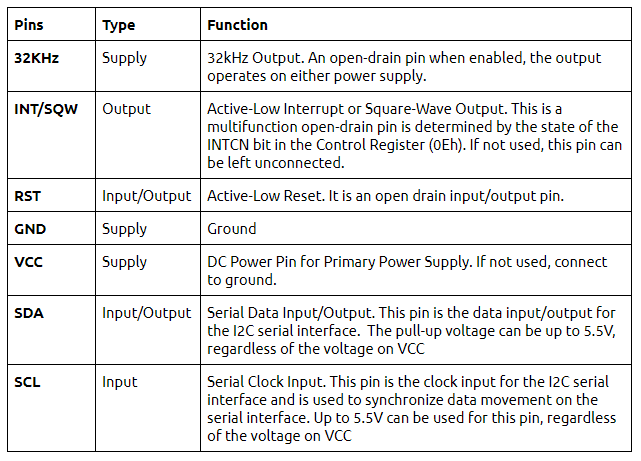
Pin Description of RTC Module
There are 8 pinouts that we included in our RTC module for you utilize should you opt out of using Qwiic connect system. We recommend using qwiic as it is the simplest and less time-consuming method to connect our board to other qwiic modules. Below is the pinout description for your reference:
Basic Connection Setup
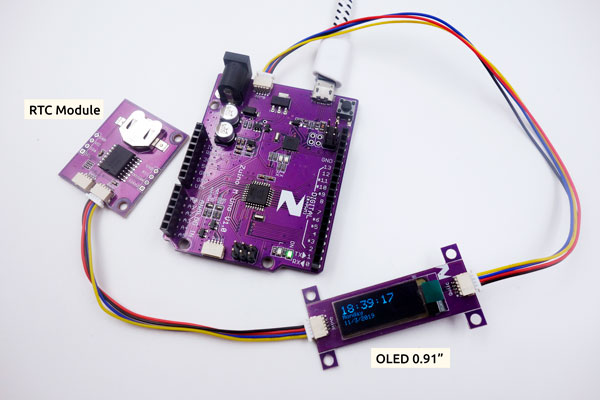
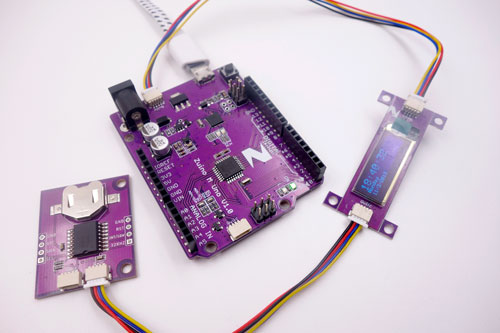
Connecting Zio RTC Module to our Arduino compatible Brain Microcontroller, Zunino M Uno is pretty easy and will not take more than a few minutes. Thanks to the Qwiic connector system, all you have to do is just connect these modules together with a qwiic cable!
Qwiic Connection Setup
For this set up you will need the following components and modules:
You only need to daisy chain all the components together and you are ready to set up and code your RTC Module with Arduino IDE.
Below is the Schematics of the connection:
Installing Library for Arduino IDE
You need to install the following library to your Arduino IDE before you can start programming your Zuino board with Zio RTC Module.
Download the following library and save it on your local Arduino IDE libraries folder:
To install the libraries open your Arduino IDE, go to Sketch tab, select Include Library -> Add .Zip Library. Select the above libraries to be included on your IDE.
Arduino has a handy guide on how to install libraries to your Arduino IDE. Check them out here!
Example Code
Current Time Settings Display
Open up File->Examples->RTClib->ds3231 and upload to your Uno connected to RTC Module. Check the serial console at 9600 baud. After a few seconds, you'll see the report that this is the first time the DS3231 has been powered up, and will set the time based on the Arduino sketch.
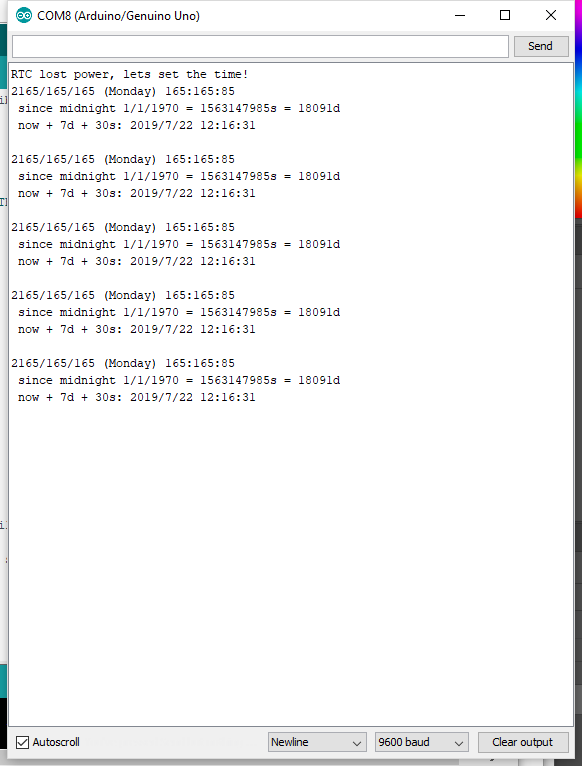
The above information is pretty inaccurate. You need to have your RTC reset to the current date and time. To resolve this follow the following steps:
Disconnect your Uno and RTC for a few seconds and connect again.
Run the sample code again.
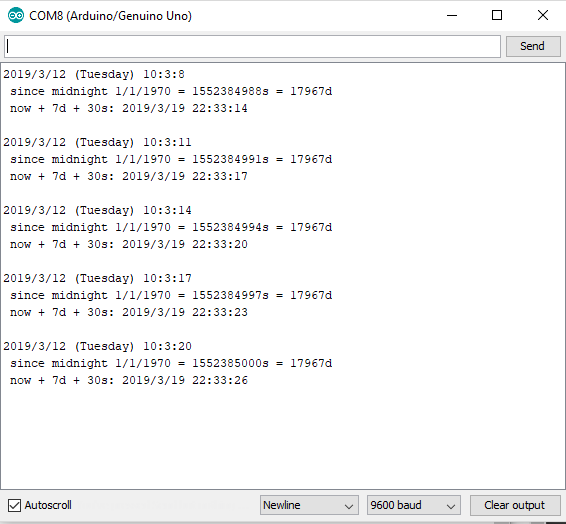
When you run the sample code, the “RTC lost power” message will not appear and instead you will get the correct date and time.
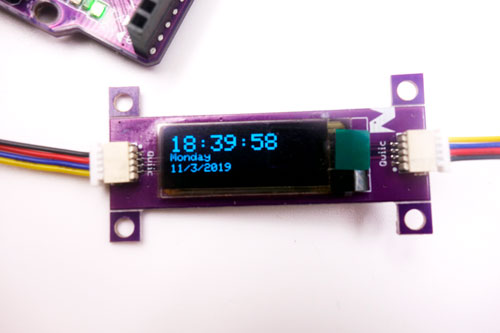
OLED display
The example code provided by the RTC library does not include an OLED display. Therefore, when you upload and run the code, your OLED will not display anything.
For this example, we set our RTC module and Zuino M Uno to display the current time, day and date and have it shown on our Zuino M Uno. You need to include Adafruit SSD1306 library and Adafruit GFX Library in your Sketch for your Zio OLED display to work.
We have a separate qwiic guide on how to setup Zio Qwic OLED 0.91” Display with any of the Zio Qwiic modules. You can check the basics here.
Below is the code for the OLED Display with RTC Module. You can download the source code in our Github page as well.
Got questions or suggestions? Or just want to greet us? Drop us a comment below!