


")

")

Control Robotic Arm with Zio Modules Part 4
This blog post is part of the Zio Robotics Series.
Introduction
This is the Final installment of ‘Control a Robotic Arm with Zio’ post. In this tutorial, we will add another part to our Robotic Arm. Previous tutorials do not include a base for the arm to rotate.
You can check other series of the Tutorial below:
- Control Robotic Arm with Zio Part 1
- Control Robotic Arm with Zio Part 2
- Control Robotic Arm with Zio Part 3
Table of Contents
- Project overview
- Difficulty Level
- Helpful Resources
- Hardware
- Software
- Schematics
- Code
- Installing Library
- Download Source Code
- Controller Settings
1. Project Overview
Difficulty Level:
Zio Padawan
Helpful resources:
You should have a basic understanding of how to install Zio development boards. In this tutorial, we assume that your development board is already configured and is ready to be set up. If you haven’t configured your board yet check out our Zio Qwiic Start Guide tutorial below to get started:
Hardware:
- Zio Zuino M UNO
- Zio 16 Servo Controller
- Zio DC/DC Booster
- 3.7V 2000mAh Battery
- Robotic Arm
Software:
Cables & Wires:
- 200mm Qwiic cable
- Male to Female Jumper Wires
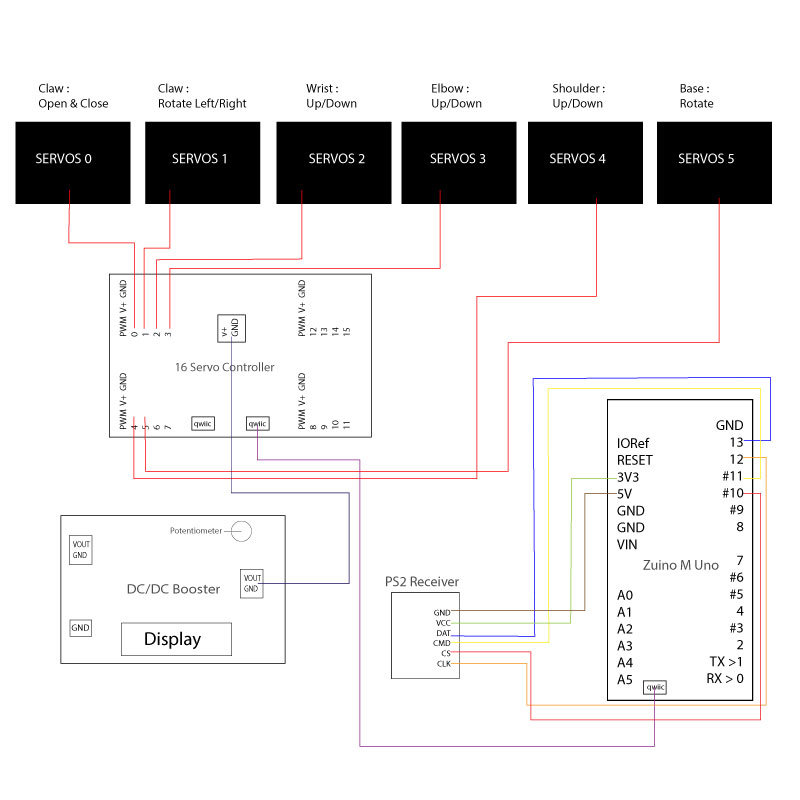
2. Schematics
Below is the Wiring Schematics of the Robotic Arm Part 4 Project
3. Robotic Arm Code
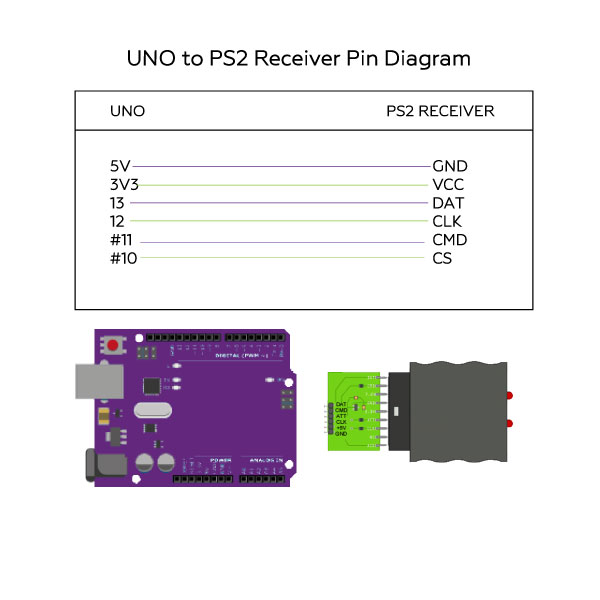
We will be using the PS2 Arduino Library to code our PS2 Wireless Controller to work with our Robotic Arm. You can find and download the source code for this Robotic Arm Part 2 project on our Github page.
Installing Library
Download and install the following libraries and save it on your local Arduino IDE libraries folder:
To install the libraries open your Arduino IDE, go to Sketch tab, select Include Library -> Add .Zip Library. Select the above libraries to be included on your IDE.
Arduino has a handy guide on how to install libraries to your Arduino IDE. Check them out here!
Download Source Code
Open Arduino IDE
Download the Code for this project here.
Run your code.
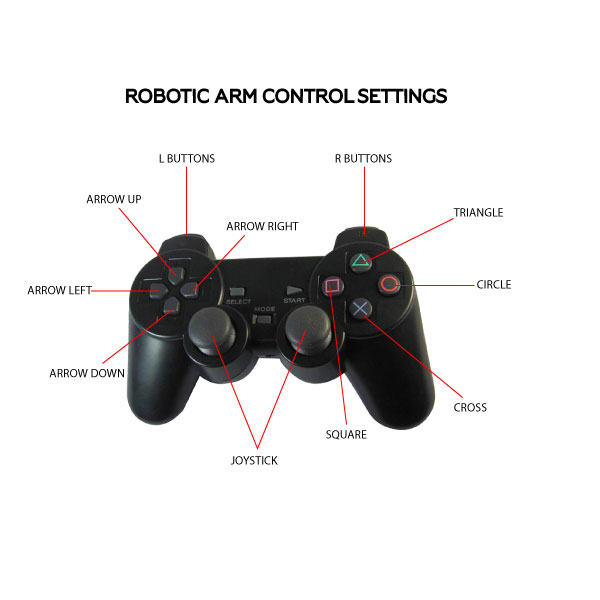
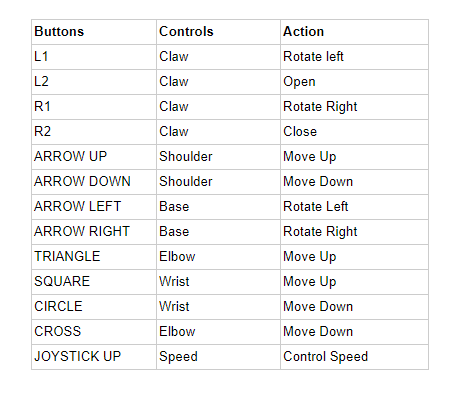
4. Control Settings of the Robotic Arm
Note: Before you can control your Robotic arm with the PS2 Controller check the following steps:
- Switch on your PS2 Controller. Check that the Mode LED lights up. If it doesn’t, press the Mode button on your controller.
- After doing the above, you need to press the reset button on your Zuino M Uno for it to read your controller settings.
That’s it! You now can control the Robotic Arm with your PS2 Controller using Zio Modules.
Got questions or suggestions? Or just want to greet us? Drop us a comment below!